

Dynamic balancing is one of the most critical—and often overlooked—steps in professional spindle repair. Even minor imbalance in a high-speed spindle can cause vibration, heat buildup, premature bearing failure, and poor surface finishes.
A properly balanced spindle runs smoother, lasts longer, and delivers consistent machining accuracy. Below is an overview of how dynamic spindle balancing is performed and why it matters.

Why Dynamic Balancing Matters
At high RPMs, even microscopic mass variations create centrifugal forces that multiply rapidly with speed. What feels insignificant at low speed becomes destructive at 20,000 RPM and above.
Proper dynamic balancing:
- Reduces vibration and chatter
- Extends bearing and spindle life
- Improves surface finish and dimensional accuracy
- Protects toolholders and tapers
- Lowers heat generation
Balancing is not optional—it’s essential for precision machining.
Static vs Dynamic Balancing
Static balancing addresses imbalance in a single plane and is insufficient for most CNC spindles.
Dynamic balancing corrects imbalance across multiple planes while the spindle is rotating, making it the only acceptable method for high-speed and motorized spindles.
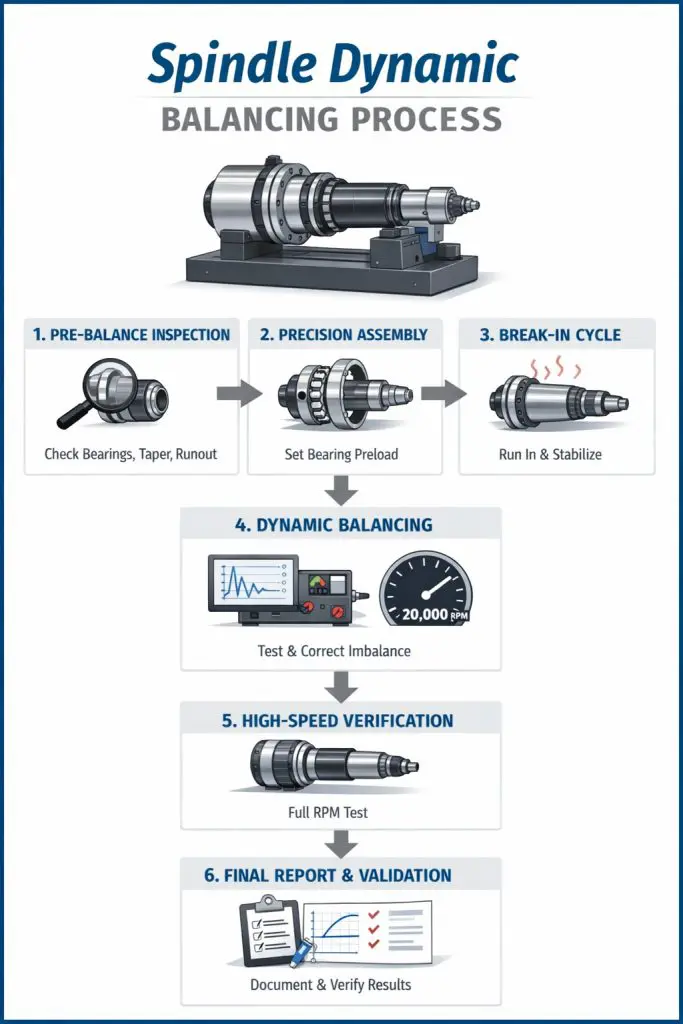
Step 1: Pre-Balance Inspection
Before balancing begins, the spindle is fully evaluated to ensure mechanical integrity.
This includes:
- Bearing condition verification
- Shaft and taper inspection
- Runout measurement
- Drawbar and retention system checks
Balancing a damaged spindle masks problems—it doesn’t fix them.
Step 2: Precision Assembly & Bearing Preload
Correct assembly is critical to balancing accuracy.
During this stage:
- Bearings are installed using controlled methods
- Preload is set to manufacturer or engineered specifications
- Assembly is performed in a clean environment to prevent contamination
Improper preload can create vibration that no amount of balancing can correct.
Step 3: Controlled Break-In Cycle
Before final balancing, the spindle is run through a controlled break-in process.
This allows:
- Bearings to seat properly
- Lubrication to distribute evenly
- Thermal stabilization
Skipping break-in leads to false balance readings.
Step 4: Dynamic Balancing on a Test Stand
The spindle is mounted to a dedicated balancing test stand and operated across its speed range.
Technicians measure:
- Vibration amplitude
- Phase angle
- Balance correction values
Corrections are applied using:
- Precision material removal
- Balance rings or weights (where applicable)
Balancing is performed incrementally to achieve optimal results.
Step 5: High-Speed Verification
Once balance corrections are complete, the spindle is tested at full operating RPM.
This step confirms:
- Vibration levels meet or exceed ISO standards
- Stable operation across speed ranges
- No abnormal heat generation
Most professional spindle repairs target G2.5 balance quality or better.
Step 6: Final Documentation & Validation
After balancing is complete, results are documented and verified.
This typically includes:
- Balance readings
- Test RPM data
- Runout measurements
- Temperature monitoring
This data provides confidence the spindle is production-ready.
What Happens If a Spindle Is Not Balanced?
Skipping or rushing dynamic balancing can lead to:
- Rapid bearing failure
- Taper fretting and toolholder damage
- Poor surface finish
- Increased downtime
- Higher long-term repair costs
Balancing is one of the most cost-effective ways to protect your spindle investment.
Dynamic Balancing as Part of a Complete Repair
Dynamic balancing should never be treated as an add-on—it’s a core part of any professional spindle rebuild. Shops that cut corners here often see repeat failures and shortened spindle life.
Final Thought
A well-balanced spindle doesn’t just run quieter—it runs more accurately, more reliably, and longer. Dynamic balancing ensures your spindle performs the way it was engineered to perform.